5 Ugly Texture Tricks That Make Every Art Journal Page More Interesting (Using Stuff You Already Own)

5 Ugly Texture Tricks That Make Every Art Journal Page More Interesting (Using Stuff You Already Own)
Here's a confession that might get my mixed-media card revoked: I used to skip backgrounds entirely.
I'd open my journal to a blank white page, draw something, hate how it floated in all that emptiness, and close the book. Repeat for weeks. The blankness felt like pressure — like the page was waiting for something worthy, and my little sketch of a coffee cup wasn't it.
Then a friend showed me her journal, and every single page had this gorgeous, layered, textured background. Not painted carefully. Not planned. Just... stuff. Crinkled tissue paper. Smears of leftover paint. Bits of junk mail. And somehow, even her worst drawings looked intentional against those messy backgrounds.
That was the moment I realized: texture is the cheat code for art journaling. It makes everything on top of it look better, and the messier you are about it, the more interesting it gets.
Here are five techniques I use constantly — all with things you probably have in your kitchen or junk drawer right now.
1. The Plastic Bag Scrunch
This one is so dumb-simple that I almost didn't include it. But it's the technique I reach for most often when I need a background fast.
What you need: Any acrylic paint (even craft paint), a plastic grocery bag, and gesso or white paint.
How it works:
- Spread a thin layer of paint across your page — doesn't matter if it's uneven. Uneven is better.
- While it's still wet, press a scrunched-up plastic bag into the paint. Lift it straight up.
- The bag pulls up paint in these organic, wrinkly patterns that look like cracked earth or old leather.
- Let it dry. Then lightly dry-brush a contrasting color or white gesso over the raised parts.
The result looks like you spent 30 minutes on it. It takes about 90 seconds.
I use this for so many pages. It's my "I don't know what this page is yet but at least it's not blank anymore" move. And weirdly, once the background has texture, I almost always know what to put on top of it. The blankness was the problem, not my ideas.
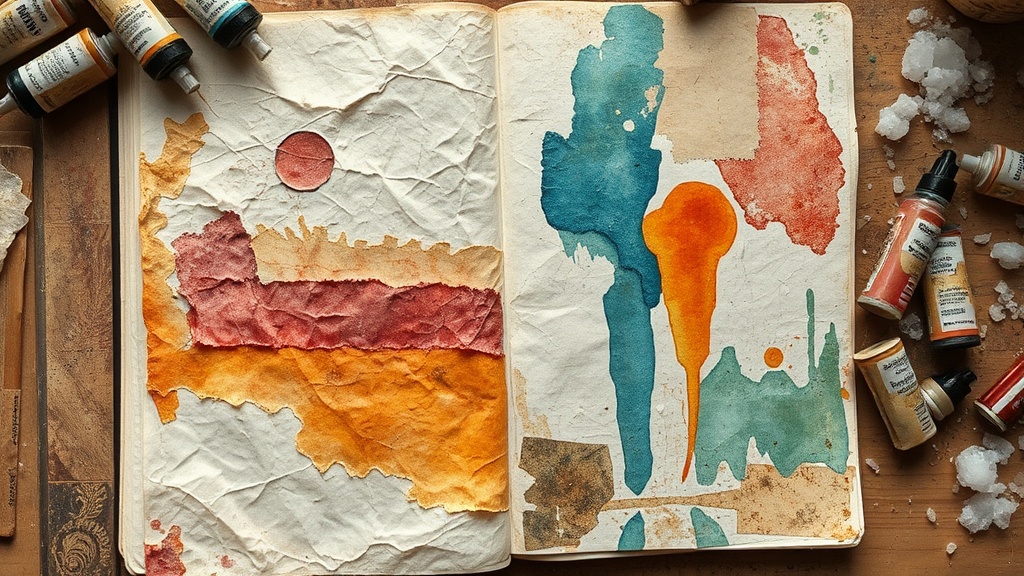
2. The Tissue Paper Wrinkle Layer
Okay, this one is genuinely my favorite texture technique of all time, and I will put it on every surface that holds still long enough.
What you need: Cheap tissue paper (gift wrap tissue, not facial tissue — though honestly, facial tissue works too, it just dissolves faster), matte medium or even regular school glue thinned with a little water.
How it works:
- Tear (don't cut) tissue paper into rough pieces. Cutting gives you clean edges. Tearing gives you the good kind of messy.
- Brush a layer of matte medium or thinned glue onto your page.
- Lay the tissue paper down, but don't smooth it flat. Wrinkle it. Push it around. Let it bunch up in spots.
- Brush more medium on top. The tissue becomes semi-transparent and the wrinkles create these beautiful ridges.
- Once dry, paint over it with a wash of color. The paint pools in the wrinkles and creates instant depth.
The tissue paper becomes part of the page — you can write on it, paint over it, collage on top of it. And those little ridges catch paint in a way that flat paper never does.
Pro tip: use printed tissue paper (like the kind with polka dots from a gift bag) for an extra layer of visual interest underneath your paint. The pattern shows through just enough to create this ghostly, layered effect that looks incredibly sophisticated for something that cost you literally nothing.
3. The Salt Trick
This is the one that makes people go "wait, WHAT?" when they see it for the first time.
What you need: Watercolor paint (or very watered-down acrylic), coarse salt (kosher salt works great, table salt works too but gives a finer pattern).
How it works:
- Paint a wet wash of watercolor onto your page. It needs to be actually wet — not damp, wet.
- While it's still glistening, sprinkle salt over it. Be generous.
- Walk away. Seriously, do not touch it. Go make tea. Feed your dog. The salt needs time to absorb the pigment.
- Once it's completely dry (this is crucial — if you brush off the salt too early you'll smear everything), brush the salt crystals off with your hand.
What's left behind looks like a constellation. Or frost on a window. Or cells under a microscope. The salt absorbs the pigment around each crystal, creating these starburst patterns that are impossible to replicate with a brush.
I use this for dreamy, spacey backgrounds — especially when I'm journaling about feelings I can't quite name. There's something about the randomness of where the salt lands that feels right for those kinds of pages. You're not controlling the outcome. You're just setting up conditions and letting chemistry do its thing.
Which, honestly, is a pretty decent metaphor for most of art journaling.
4. The Credit Card Scrape
Save your expired credit cards, gift cards, hotel key cards — anything with a flat, firm edge. They're the best palette knives you'll never have to buy.
What you need: An old card, two or three colors of acrylic paint.
How it works:
- Blob a few different paint colors directly onto your page. Don't mix them. Just plop them down in rough stripes or random spots.
- Take your card and drag it across the paint in one confident stroke. Don't go back and forth — one direction, one pull.
- The card smears the colors together at the edges but keeps them distinct in the middle, creating these gorgeous streaky, blended textures.
- Add more paint, scrape again at a different angle. Layer it up.
The key word here is confident. If you go slowly and tentatively, you get mud. If you pull fast and commit, you get these beautiful, unexpected color combinations with visible texture from the card edge.
I learned this the hard way. My first twenty attempts were muddy brown smears because I kept going back over the same spot trying to "fix" it. Art journaling rule number one: stop before you think you're done. The page was already better three strokes ago.
5. The Junk Mail Collage Base
This is less a "technique" and more a "lifestyle change" that will fundamentally alter how you look at your mail.
What you need: Junk mail, catalogs, old envelopes, receipts, literally any paper waste. Plus glue stick or matte medium.
How it works:
- Tear (again, tear — never cut for this) random pieces of paper from whatever's lying around. Old envelopes with those blue security patterns inside are GOLD. Receipts that have faded to pink. Pages from magazines where you only want the texture of the text, not the actual words.
- Glue them down overlapping, at angles, some upside down. Cover your whole page or just part of it.
- Once dry, gesso over the whole thing — one thin coat. This does two things: it unifies all those random papers into one cohesive surface, and it creates a slightly translucent layer where you can still see hints of text and pattern underneath.
- Now paint, draw, or write on top. You've got an instant textured, layered base with built-in visual interest.
I keep a basket by my front door where I toss interesting paper scraps. Sadie thinks it's unhinged. Gesso (the dog, not the art supply) once ate a piece I was saving — a perfect envelope interior with this blue crosshatch pattern. I'm still upset about it.
But the point is: you start seeing potential texture everywhere. The bakery bag from your morning croissant. The tag you cut off a new shirt. The little paper sleeve from a tea bag. All of it becomes material.
The Real Secret: Texture Gives You Permission
Here's what I've figured out after filling probably fifteen journals this way: texture removes the preciousness from the page.
A blank white page feels like it's demanding something perfect. A page that's already been scrunched with a plastic bag, layered with torn tissue paper, and scraped with an old gift card? That page is already messy. It's already imperfect. You can't ruin it because it started "ruined."
And that's when the good stuff happens. When you stop worrying about wrecking the page, you start actually making things. You write the honest thing. You try the weird color. You draw the face even though you "can't draw faces."
Texture is the background, sure. But really, it's the permission slip.
So go dig through your recycling bin, find a plastic bag and some old paint, and wreck a page on purpose. I promise — it'll be the best page in your journal.